How to Install Node.js and NPM on Windows, Mac and Linux
Before we begin our installation journey of Node.js and NPM, let’s fully understand the landscape.
WHAT IS NODE.JS?
Node.js is not just a technology, it’s revolution in the development of websites. It is a runtime environment that uses the Chrome V8 JavaScript engine, built from necessity to extend JavaScript beyond your browser’s boundaries. This allows developers to run JavaScript on the server, so they can develop network applications fast and scalablely.
Node.js is an excellent choice for applications with intensive data processing, RESTful API development and JSON APIs because of its ability to handle synchronous operations.
THE NECESSITY OF NODE.JS
Node.js redefined web application development with its non-blocking, event-driven architecture. This paradigm shift makes it possible to handle several connections at the same time, without overloading a server, which is great for developing applications with superior performance. The use of JavaScript in both the frontend as well as the backend makes development processes more efficient, reduces background switching and increases productivity.
INTRODUCTION TO NPM
npm is the world’s biggest software registry, a command line tool that supports Node.js. It handles package management, enabling developers to share, install, and manage dependencies (external libraries and tools) in their projects. npm promotes the culture of code sharing and reuse, allowing access to a large number of packages that speed up development.
DISTINGUISHING NODE.JS FROM NPM
It is important to understand the distinction between Node.js and npm. The environment that runs your JavaScript code is Node.js, while the npm tool helps you manage external packages used by your projects. Together, developers can create and manage complex applications with ease thanks to the synergy between them.
Now that we know what is Node.js and NPM, let’s dive into the process of installing Node.js and npm across the diverse platforms of Windows, macOS, and Linux.
Table of Contents
- Installing Node.js and NPM on Windows
- Installing Node.js and NPM on MacOs
- Installing Node.js and NPM on Linux
- Troubleshooting
- Conclusion
- FAQ (Frequently Asked Questions)
Installing Node.js and NPM on Windows
There are different options to install Node.js on Windows. Choose the one that you’re more comfortable with. Personally, I would use Option 1.
Option 1: Via the Official Installer (Recommended)
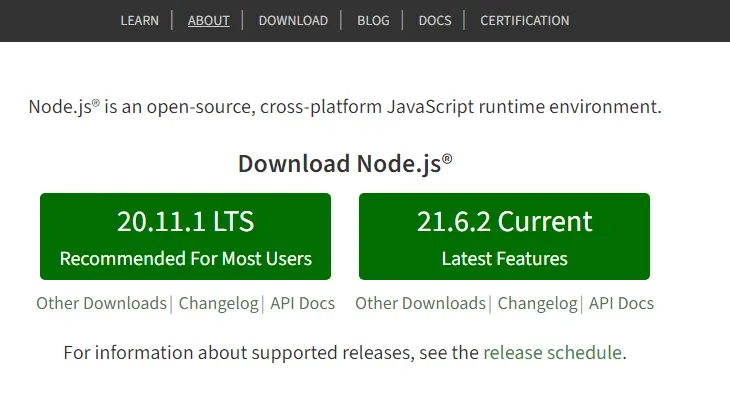
The journey starts with a simple visit to the official Node.js website, where you will be greeted by two primary options: LTS Long Term Support and Current. LTS is the preferred option for those seeking stability and reliability because it is supported for an extended period of time. On the other hand, the current version is designed for developers who want to experiment with the latest features, but with a shorter support cycle.
Step-by-Step Installation:
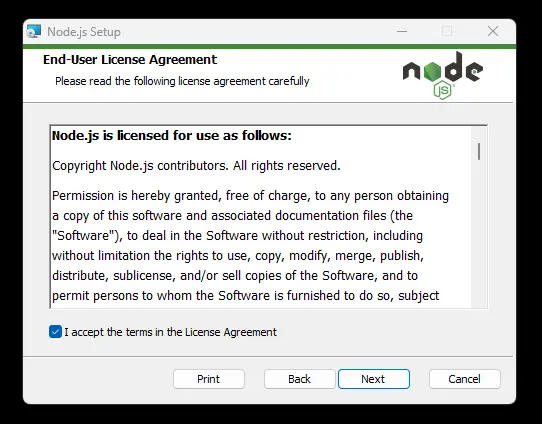
1. After installing the .msi file, you will see a set of steps for starting the installer. The initial screens are straightforward, requiring acceptance of the license agreement and selection of the installation directory. For beginners, the default directory is recommended to avoid path complexities.

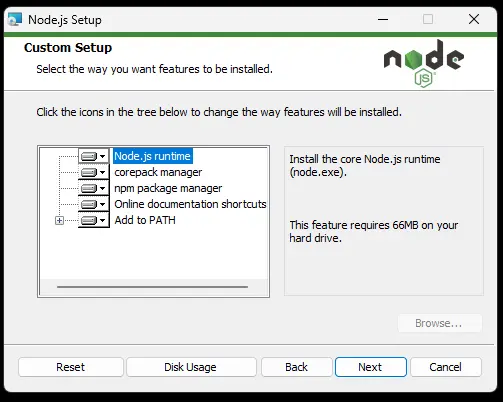
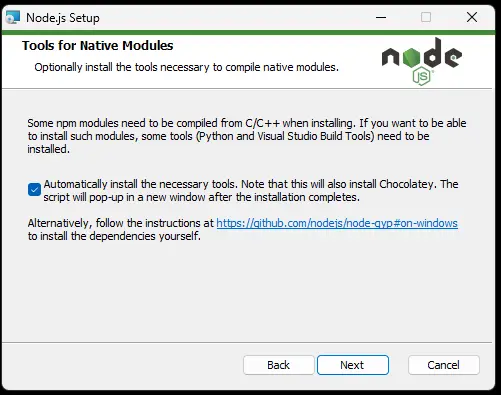
2. The component selection stage is critical. Although the default selection is generally sufficient, make sure that a “npm package manager” option is checked. Additional tools needed for the compilation of native modules are also offered at this stage, which are useful for those planning to work with packages that need to be built from source.
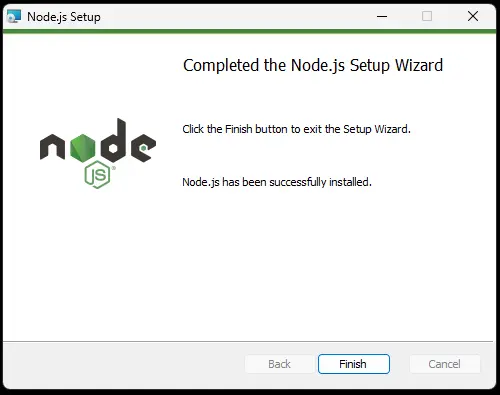
3. The installation concludes with a few more prompts, including options for automatically installing necessary dependencies and configuring your system’s PATH. Ensuring node and npm commands are accessible from any terminal window enhances usability.
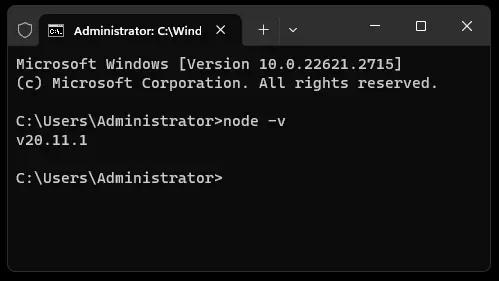
4. Verify the installation by opening Command Prompt and typing node -v and npm -v. Successful installation is confirmed by the display of the respective versions.
Option 2: Chocolatey: A Package Manager Approach
The installation process is simplified by Chocolatey, a widely used Windows package manager and offers an easy alternative to GUI based installers through command line instructions.
The initial step involves setting up Chocolatey on your Windows machine. This process is designed to be straightforward, requiring an elevated Command Prompt to ensure that you have the necessary permissions to install and configure software on your system.
1. Opening an Elevated Command Prompt: Press the Windows key, type “cmd”, right-click on the Command Prompt app, and select “Run as administrator”. This action opens a Command Prompt window with administrative privileges, a prerequisite for installing Chocolatey.
2. Installing Chocolatey: Navigate to Chocolatey’s official installation page to find the latest installation command. As of the latest update, you can install Chocolatey by copying the provided PowerShell command into your elevated Command Prompt. The command looks something like
Set-ExecutionPolicy Bypass -Scope Process -Force; [System.Net.ServicePointManager]::SecurityProtocol = [System.Net.ServicePointManager]::SecurityProtocol -bor 3072; iex ((New-Object System.Net.WebClient).DownloadString('https://community.chocolatey.org/install.ps1'))This script downloads and executes the Chocolatey installation script directly from Chocolatey’s website. It ensures that Chocolatey is installed and configured correctly on your system.
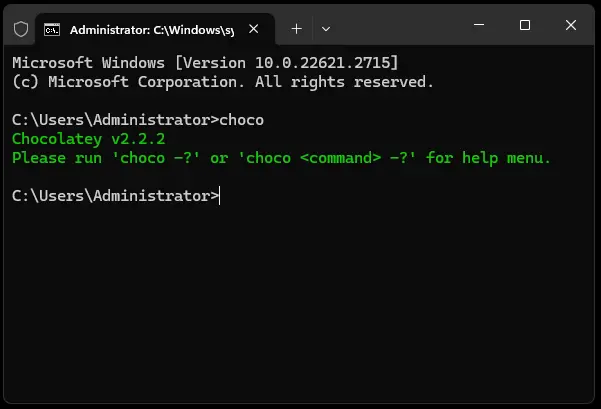
3. Verifying Chocolatey Installation: To confirm that Chocolatey has been installed successfully, type choco in the Command Prompt. If the installation went smoothly, you should see a list of Chocolatey commands and options displayed.
Installing Node.js with Chocolatey
With Chocolatey now installed, you’re set to install node and npm with just a few commands.
1. Installing Node.js: In your elevated Command Prompt, enter the following command: choco install nodejs. This command instructs Chocolatey to download and install the latest stable version of node and npm from its repository. Chocolatey takes care of finding, downloading, and installing the packages, along with resolving any dependencies.
2. Choosing a Node.js Version: If you need a specific version of node, Chocolatey allows you to specify versions during installation. For example, choco install nodejs --version=20.11.1 installs that specific version of Node.js.
Ensuring Everything is Up and Running
After installation, it’s crucial to verify that Node.js and npm are correctly installed and accessible from your Command Prompt.
1. Checking Node.js Version: Type node -v in your Command Prompt. This command returns the current version of Node.js installed on your system, confirming the installation.
2. Checking npm Version: Similarly, typing npm -v will display the version of npm installed, indicating that npm is ready to manage your JavaScript packages.
3. Option 3: Using nvm-windows: A Comprehensive Guide to Node Version Management
As a professional Node.js developer, I have received numerous requests inquiring about how to install multiple versions of Node.js. The answer is nvm-windows.
nvm-windows is a Windows specific version manager for Node.js, which offers unparalleled flexibility in managing multiple versions on the same system. For developers working on a variety of projects that require different versions of Node.js, or for those who need to test their applications across multiple versions, this tool is particularly helpful.
Step-by-Step Installation of nvm-windows
1. Downloading nvm-windows: The first step is to acquire the nvm-windows installer:
- Navigate to the nvm-windows releases page on GitHub.
- Look for the latest release and download the
nvm-setup.zipfile. This file contains the installer necessary for setting up nvm-windows on your system.
2. Running the Installer:
- Once downloaded, extract the
nvm-setup.zipfile to access thenvm-setup.exeexecutable. - Run
nvm-setup.exeto launch the installer. You’ll be greeted with a graphical interface that guides you through the installation process. - The installer will ask where to install nvm-windows and whether you’d like to add nvm to your system PATH. Adding nvm to the PATH is recommended for easier access to its commands from any command prompt or terminal window.
3. Verifying the Installation:
- Open a new command prompt window and type
nvm version. This command should return the version of nvm-windows installed, indicating a successful installation.
Installing Node.js with nvm-windows
With nvm-windows installed, you can now easily manage multiple Node.js versions:
1. Installing a Specific Node.js Version:
- To install a specific version of Node.js, use the command
nvm install <version>. For example, to install Node.js version 20.11.1, you would enternvm install 20.11.1in the command prompt. - nvm-windows will download and install the specified Node.js version along with npm, making it ready for use.
2. Installing the Latest Node.js Version:
- If you want to install the most recent version of Node.js, simply use
nvm install latest. This command automatically fetches and installs the latest available version of Node.js.
Switching Between Node.js Versions
nvm-windows simplifies the process of switching between installed node versions:
1. Listing Installed Versions:
- Before switching, you can see all installed Node.js versions by typing
nvm listin the command prompt. This command displays a list of all Node.js versions currently managed by nvm-windows.
2. Switching Versions:
- To switch to a different version of Node.js, use the command
nvm use <version>. For instance, if you want to switch to version 20.11.1, you would enternvm use 20.11.1. - This command sets the specified Node.js version as the active version, updating your system’s PATH to point to the selected version’s executables.
3. Verifying the Active Node.js Version:
- To ensure you’re using the intended Node.js version, you can verify it by typing
node -vin the command prompt. This command returns the version of Node.js currently active, confirming the switch.
Installing Node.js and NPM on MacOs
There are different options to install Node.js on MacOS as well. Choose the one that you’re more comfortable with. Personally, I would use Option 1 for MacOS as it is very straight forward.
Option 1: Via the Official Installer (Recommended)
You can install Node.js on a Mac using a .pkg installer, which provides a straightforward, graphical installation process. The .pkg file is a macOS installer package that contains everything you need to install Node.js on your system. Here’s a detailed guide on how to do it:
Step 1: Download the Node.js .pkg Installer
- Visit the Official Node.js Website: Open your web browser and go to the official Node.js website.
- Select the Version: On the homepage, you’ll find two main versions available for download:
- LTS (Long Term Support): This version is recommended for most users. It’s more stable and receives longer support.
- Current: This version has the latest features but might be less stable. It’s suitable for developers who need or want to work with the latest features.
- Download the
.pkgInstaller: Click on the “macOS Installer” link for the version you choose. This will download a.pkgfile to your computer.
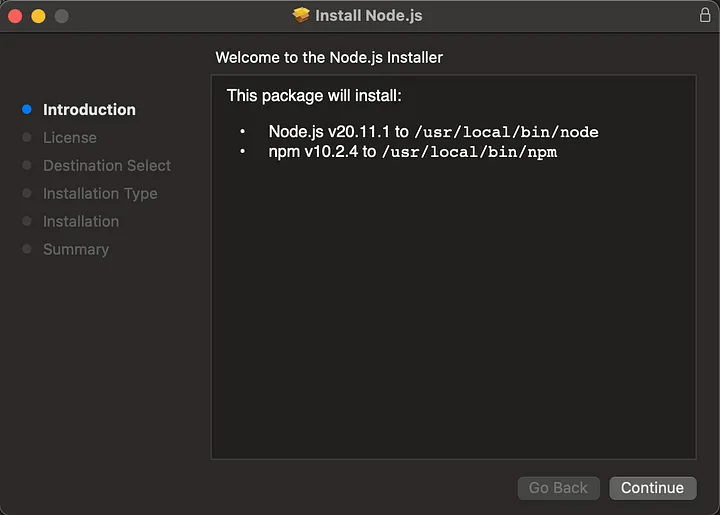
Step 2: Run the Installer
- Open the Downloaded File: Navigate to your downloads folder and double-click the
.pkgfile you downloaded from the Node.js website. - Start the Installation Process: The installer will launch and present you with a welcome screen. Click “Continue” to proceed.
- Review the Software License Agreement: Read through the license agreement, click “Continue”, and then agree to the terms to proceed with the installation.
- Select the Install Location: By default, Node.js will install in the standard applications directory. You can change this location if necessary, but for most users, the default is appropriate. Click “Install” to continue.
- Authenticate: You may be prompted to enter your macOS user password. This is necessary because the installer needs permission to write to your applications directory and modify system PATH variables.
- Complete the Installation: The installer will copy the necessary files to your system. Once completed, you’ll see a screen indicating that the installation was successful. Click “Close” to exit the installer.
Step 3: Verify the Installation
- Open the Terminal: You can find the Terminal application in the “Utilities” folder within your “Applications” folder, or you can search for it using Spotlight.
- Check Node.js Version: In the Terminal, type
node -vand press Enter. This command should return the version of Node.js you just installed, confirming that the installation was successful. - Check npm Version: Similarly, you can check if npm (Node Package Manager), which is installed with Node.js, is working by typing
npm -vin the Terminal.
Option 2: Using Homebrew
Homebrew enhances macOS by providing a streamlined way to manage software packages, making it an ideal tool for installing Node.js and npm.
Installation Steps:
- Installing Homebrew itself is straightforward. A single line of code in the Terminal initiates the installation script, which guides through the process, explaining each step and requesting permission as needed.
- Once Homebrew is ready, installing Node.js is as simple as running
brew install node. Homebrew takes care of downloading, unpacking, and installing Node.js along with npm, integrating them into the system just like any other software managed by Homebrew. - Verification of the installation is crucial. Running
node -vandnpm -vin the Terminal confirms the success of the process, showing the installed versions of Node.js and npm, respectively.
Option 3: nvm: Flexible Version Management
nvm for macOS operates similarly to its Linux counterpart, providing a robust solution for managing multiple Node.js versions without conflicts.
Installation and Use:
- Installing nvm on macOS involves running a curl command in the Terminal, which fetches and executes the installation script from nvm’s GitHub repository. The script makes adjustments to your profile file (
~/.bash_profile,~/.zshrc,~/.profile, or~/.bashrc), adding the necessary lines to initialize nvm. - Using nvm to manage Node.js versions is straightforward. Commands like
nvm install <version>allow for the installation of specific Node.js versions. This flexibility supports development environments requiring specific versions, facilitating testing and development across diverse projects. - Switching and verifying Node.js versions are integral parts of the process.
nvm use <version>changes the active Node.js version, whilenvm listdisplays all installed versions, helping maintain a clear overview of your development environment.
Installing Node.js and NPM on Linux
The versatility and openness of Linux provide multiple paths for installing Node.js and NPM, each catering to different preferences and distribution specifics.
Option 1: Package Manager Installation
Linux distributions come with their own package managers, offering an official, albeit sometimes outdated, channel for installing Node.js and npm.
Ubuntu/Debian:
- Preparation: Before installing, it’s wise to update the package repository to ensure access to the latest versions available. Running
sudo apt updateachieves this. - Installation: The command
sudo apt-get install nodejs npminstalls Node.js and NPM. While convenient, this method may not provide the latest versions due to the conservative nature of official repositories. - Verification: Checking the versions with
node -vandnpm -vconfirms the installation but be mindful of potential version discrepancies with the latest releases.
Fedora/CentOS:
- Fedora and CentOS users employ
dnforyumrespectively, with similar commands (sudo dnf install nodejsorsudo yum install nodejs) initiating the installation. - These package managers handle dependencies and integrate Node.js into the system, offering a straightforward installation process.
- Verification remains an essential step, ensuring the installation’s success and noting the installed versions.
Option 2: nvm – Version Management
nvm stands out as a universal tool across Unix-like systems, including Linux, for managing multiple Node.js versions efficiently.
Installation and Usage:
- Installation involves executing a curl or wget command, pulling the installation script directly from nvm’s GitHub repository. The script modifies your shell profile script, ensuring nvm is available upon opening a new terminal session.
- Installing Node.js versions with nvm gives you the flexibility to work with specific versions as needed. It isolates each version, allowing for side-by-side installations without conflict.
- Switching between versions is a core feature of nvm, facilitating development and testing across multiple Node.js environments. Verification through
nvm listandnode -vensures you’re working with the intended version.
Troubleshooting
Given the diversity in operating systems among developers, it’s essential to address specific challenges that may arise on Windows, Linux, and macOS. This section will delve into common troubleshooting tips for each, aiming to smooth out the bumps on your development journey.
Windows Troubleshooting Tips
Environment Variables
One of the most common issues on Windows is improperly set environment variables. After installation, if the command prompt doesn’t recognize node or npm commands, it’s likely due to the Node.js executable not being in your PATH. To fix this, search for “Environment Variables” in your system settings, and add the path to your Node.js installation (usually C:\Program Files\nodejs) to the System Path variable.
Administrator Privileges
Windows users might encounter permission issues when installing packages globally using npm. Running Command Prompt as an Administrator can often resolve these issues. Right-click on Command Prompt in the start menu and select “Run as administrator,” then try your npm command again.
macOS Troubleshooting Tips
Command Line Tools
macOS users might encounter issues related to Xcode Command Line Tools, which are required for compiling native add-ons. If you’re facing such issues, open Terminal and run xcode-select --install to install these tools, or xcode-select --reset if they’re already installed but not properly recognized.
Access Permissions
Similar to Linux, macOS users may encounter permission issues, especially with directories managed by Homebrew. Ensuring you have the correct permissions on the directories Homebrew uses (like /usr/local/share) can alleviate these issues. Running brew doctor can help identify and resolve these permission problems.
PATH Issues
If your Terminal does not recognize node or npm after installation, it’s likely a PATH issue. For macOS, your .bash_profile, .zshrc, or equivalent file needs to include the path to Node.js. This can be automatically configured through the installation process of nvm or by manually editing the profile file to include the correct path to Node.js.
Linux Troubleshooting Tips
Permission Denied
Linux users may face “EACCES” errors when trying to install packages globally. This issue stems from npm trying to install packages in a directory where the user doesn’t have write permissions. Using a node version manager (nvm) circumvents this by installing Node.js and npm in the user’s home directory, avoiding the need for sudo permissions. Alternatively, you can change npm’s default directory or use sudo, though these approaches are less recommended for security reasons.
Binary Compatibility
Occasionally, the Node.js version installed from a distribution’s repository might not be compatible with some npm packages. This is typically because the version is too old. Using nvm or compiling Node.js from source are ways to ensure you have a version compatible with your needs.
Conclusion
In this blog post, we have covered the different methods of installing Node.js on Windows, macOS, and Linux. By exploring various installation techniques, including the use of package managers like Chocolatey for Windows and Homebrew for macOS, as well as version managers like nvm and nvm-windows, we aimed to provide a clear and thorough guide for setting up Node.js across multiple operating systems.
Node.js plays a critical role in contemporary web development, enabling developers to build scalable and efficient server-side applications. This makes understanding the installation process crucial for developers of all skill levels. If you want to explore further, I would recommend learning MEAN stack to you. We have a dedicated blog post to get more details on MEAN stack guide.
For businesses or developers looking for professional assistance with their Node.js projects, WireFuture stands as a reliable Node.js development company. With a focus on delivering high-quality and customized Node.js solutions, WireFuture is dedicated to meeting your project’s specific needs, ensuring optimal performance and success.
FAQ (Frequently Asked Questions)
A: Node.js is an open-source, cross-platform JavaScript runtime that allows you to execute JavaScript code server-side. It’s essential for developing scalable network applications, such as web servers and APIs, and allows for real-time communication and data processing.
A: npm stands for Node Package Manager. It’s a tool that comes with Node.js and manages JavaScript packages. It allows developers to install, share, and control dependencies (libraries and tools) in their projects.
A: Installing Node.js typically requires administrative privileges because it needs to add its directory to your system’s PATH. If you’re unable to install with admin rights, consider using nvm-windows or a portable version of Node.js, though these approaches might have limitations.
A: The LTS (Long-Term Support) version is recommended for most users because it receives security and stability updates for a longer period. The Current version has the latest features but is better suited for developers who need those features and are willing to handle potentially more frequent updates and changes.
A: The easiest way to switch between versions on macOS is by using nvm (Node Version Manager). After installing nvm, you can install multiple versions of Node.js and switch between them using the nvm use <version> command.
node command is not recognized. What should I do?A: This issue usually occurs because the installation path for Node.js is not added to your PATH environment variable. You can manually add it or reinstall Node.js using a version manager like nvm, which automatically handles the PATH setup.
A: Permission errors usually happen when trying to install packages globally without proper access. Using a version manager like nvm or changing npm’s default directory can solve these issues. Avoid using sudo with npm for security reasons.
A: Yes, if you’re using a version manager like nvm or nvm-windows. These tools allow you to install multiple versions and switch between them as needed.
A: On Windows, you can uninstall via the “Add or Remove Programs” feature. On macOS, delete the Node files from /usr/local/lib and /usr/local/include, along with the binaries in /usr/local/bin. On Linux, use your package manager to uninstall. For all systems, you may also need to manually remove npm and any global packages.
Step into the future with WireFuture at your side. Our developers harness the latest technologies to deliver solutions that are agile, robust, and ready to make an impact in the digital world.

Tapesh Mehta is a seasoned tech worker who has been making apps for the web, mobile devices, and desktop for over 15+ years. Tapesh knows a lot of different computer languages and frameworks. For robust web solutions, he is an expert in Asp.Net, PHP, and Python. He is also very good at making hybrid mobile apps, which use Ionic, Xamarin, and Flutter to make cross-platform user experiences that work well together. In addition, Tapesh has a lot of experience making complex desktop apps with WPF, which shows how flexible and creative he is when it comes to making software. His work is marked by a constant desire to learn and change.
No commitment required. Whether you’re a charity, business, start-up or you just have an idea – we’re happy to talk through your project.
Embrace a worry-free experience as we proactively update, secure, and optimize your software, enabling you to focus on what matters most – driving innovation and achieving your business goals.