How To Integrate PayPal IPN in ASP.NET Core: Complete Guide
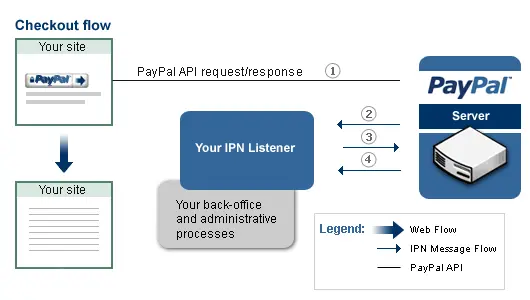
In this blog we will learn how to integrate PayPal IPN in ASP.NET Core. PayPal IPN (Instant Payment Notification) is a powerful feature that sends real time notifications of transactions on your PayPal account. Whenever a transaction goes through, PayPal directs an IPN to a specified URL on your own server, telling you about the transaction. This is critical in automating tasks such as order status updates, inventory management, and maintaining accurate records without human intervention.
Table of Contents
- Prerequisites
- Step-by-Step Guide to Integrate PayPal IPN in ASP.NET Core
- Implement PayPal IPN Handler Logic
- Configure PayPal IPN Settings
- Testing PayPal IPN on Localhost
- Conclusion
- References
Prerequisites
Before you start integrating PayPal IPN with ASP.NET Core, make sure you have the following:
- ASP.NET Core Development Environment Setup: Ensure you have a working setup with Visual Studio or Visual Studio Code, along with the .NET SDK installed. You can download and install ASP.NET Core 8 from the Microsoft .NET Download page.
- PayPal Business Account: You need a PayPal Business account to receive IPN notifications. Sign up on the PayPal website if you don’t have one already.
- Basic Understanding of ASP.NET Core MVC and Web API: Familiarity with creating controllers, handling HTTP requests, and using dependency injection in ASP.NET Core is essential for implementing the IPN handler.
Step-by-Step Guide to Integrate PayPal IPN in ASP.NET Core
1. Create a New ASP.NET Core Web API Project
- Open Visual Studio or Visual Studio Code.
- Create a new ASP.NET Core Web API project.
dotnet new webapi -n PayPalIPNIntegration2. Add Necessary PayPal Dependencies
- Install the required PayPal NuGet package.
dotnet add package PayPal3. Create a New API Controller for IPN Listener
- Add a new controller named
PayPalIPNController.cs.
using Microsoft.AspNetCore.Mvc;
using System.Net.Http;
using System.Threading.Tasks;

namespace PayPalIPNIntegration.Controllers
{
    [Route("api/[controller]")]
    [ApiController]
    public class PayPalIPNController : ControllerBase
    {
        [HttpPost]
        public async Task<IActionResult> IPNHandler()
        {
            using (var reader = new StreamReader(Request.Body))
            {
                var ipnMessage = await reader.ReadToEndAsync();

                var verificationResponse = await VerifyIPN(ipnMessage);

                if (verificationResponse == "VERIFIED")
                {
                    // Process the IPN message here
                }
                else
                {
                    // Log for manual investigation
                }

                return Ok();
            }
        }

        private async Task<string> VerifyIPN(string ipnMessage)
        {
            using (var client = new HttpClient())
            {
                var content = new StringContent("cmd=_notify-validate&" + ipnMessage, Encoding.UTF8, "application/x-www-form-urlencoded");
                var response = await client.PostAsync("https://ipnpb.paypal.com/cgi-bin/webscr", content);
                return await response.Content.ReadAsStringAsync();
            }
        }
    }
}
4. Define the Controller to Handle IPN Messages
- The
IPNHandlermethod handles incoming IPN messages. - The
VerifyIPNmethod sends the message back to PayPal for verification.
Now you have a basic setup for an IPN listener in ASP.NET Core. Customize the logic inside IPNHandler to process IPN messages according to your application’s needs.
Implement PayPal IPN Handler Logic
1. Create a Method to Handle PayPal IPN Messages
- Define a method in your controller to handle IPN messages from PayPal.
- This method should be an HTTP POST endpoint to receive IPN data.
[HttpPost]
public async Task<IActionResult> IPNHandler([FromForm] PayPalIPNMessage message)
{
    using (var reader = new StreamReader(Request.Body))
    {
        var ipnMessage = await reader.ReadToEndAsync();

        // Validate the IPN message
        var verificationResponse = await VerifyIPN(ipnMessage);

        if (verificationResponse == "VERIFIED")
        {
            // Process the verified IPN message
            ProcessIPNMessage(message);
        }
        else
        {
            // Log for manual investigation if the message is not verified
            LogWarning("Invalid IPN message: " + ipnMessage);
        }

        return Ok();
    }
}
2. Validate the PayPal IPN Message
- Validation is crucial to ensure the IPN message is legitimately from PayPal.
- Send the received message back to PayPal for verification using HttpClient.
private async Task<string> VerifyIPN(string ipnMessage)
{
    using (var client = new HttpClient())
    {
        var content = new StringContent("cmd=_notify-validate&" + ipnMessage, Encoding.UTF8, "application/x-www-form-urlencoded");
        var response = await client.PostAsync("https://ipnpb.paypal.com/cgi-bin/webscr", content);
        return await response.Content.ReadAsStringAsync();
    }
}
3. Process the Verified IPN Message
- After verifying the IPN message, extract the necessary information.
- Update order status or perform other business logic based on the IPN data.
private void ProcessIPNMessage(PayPalIPNMessage message)
{
    // Example: Update order status
    if (message.PaymentStatus == "Completed")
    {
        // Update order status to completed
        UpdateOrderStatus(message.Invoice, "Completed");
    }
    else if (message.PaymentStatus == "Pending")
    {
        // Update order status to pending
        UpdateOrderStatus(message.Invoice, "Pending");
    }

    // Perform other business logic as needed
}

private void UpdateOrderStatus(string invoice, string status)
{
    // Logic to update the order status in your database
    // Example:
    // var order = _orderRepository.GetByInvoice(invoice);
    // order.Status = status;
    // _orderRepository.Update(order);
}
In the above code snippets, the IPN handler method IPNHandler receives the IPN message, reads it, and then sends it back to PayPal for verification using the VerifyIPN method. If the verification is successful, the ProcessIPNMessage method is called to handle the business logic, such as updating the order status based on the payment status. This ensures a secure and reliable payment integration, allowing the application to process transactions accurately and efficiently.
Configure PayPal IPN Settings
1. Log In to Your PayPal Account
- Open your web browser and go to the PayPal website.
- Log in using your PayPal Business account credentials.
2. Navigate to the IPN Settings Page
- Once logged in, navigate to your account settings.
- Click on your profile icon or name in the upper right corner to access the account menu.
- Select “Account Settings” or “Profile Settings” from the dropdown menu.
3. Go to Instant Payment Notification (IPN) Settings
- In the account settings menu, find and click on “My Selling Tools” or “Website Payment Preferences”.
- Look for the “Instant Payment Notification” section.
4. Access IPN Settings
- Click the “Update” link next to “Instant Payment Notification”.
5. Set the Notification URL
- On the IPN settings page, you’ll see an option to specify the URL where PayPal should send IPN messages.
- Check the box to enable IPN messages if it’s not already enabled.
6. Enter the URL of Your IPN Handler Endpoint
- In the provided field, enter the URL of your IPN handler endpoint. This is the URL where your ASP.NET Core application is set up to receive IPN messages.
- For example, if your application is hosted at
https://www.yourdomain.comand your IPN handler is located atapi/paypalipn, the URL would behttps://www.yourdomain.com/api/paypalipn.
7. Save Your Settings
- After entering the notification URL, click the “Save” button to apply the changes.
By configuring the IPN settings in your PayPal account, you’re enabling PayPal to send transaction notifications to your specified URL. This integration allows your ASP.NET Core application to receive and process payment information in real-time, ensuring smooth and automated transaction handling.
Testing PayPal IPN on Localhost
1. Deploy the ASP.NET Core Application on IIS
Install IIS on Your Local Machine
- Windows 10/11: Go to Control Panel > Programs > Programs and Features > Turn Windows features on or off. Check the box for Internet Information Services (IIS) and click OK.
Ensure ASP.NET Core Hosting Bundle is Installed
- Download and install the ASP.NET Core Hosting Bundle.
Deploy Your ASP.NET Core Application to IIS
- Open your ASP.NET Core project in Visual Studio.
- Right-click the project in Solution Explorer and select “Publish.”
- Choose the target as “Folder” and specify a path. Click “Publish.”
Configure the Site in IIS Manager
- Open IIS Manager (
inetmgr). - Add a new website or configure an existing one.
- Set the physical path to the folder where you published your project.
- Configure the site bindings (port, hostname, etc.).
2. Set Up Port Forwarding on Router
Access Your Router Settings
- Open your web browser and enter your router’s IP address (e.g., 192.168.1.1) in the address bar.
- Log in with your router’s admin credentials.
Configure Port Forwarding
- Navigate to the port forwarding section (often found under Advanced settings) but it depends upon your router.
- Forward a specific port (e.g., 5000) to your local machine’s IP address and the port IIS is using for your application.
3. Use a Tunneling Service (Alternative Method)
Set Up a Tunneling Service Like Ngrok
- Download and install ngrok.
Run Ngrok
- Open a command prompt and navigate to the folder where ngrok is installed.
- Run
ngrok http [port](e.g.,ngrok http 5000).
Get the Public URL from Ngrok
- Ngrok will provide a public URL (e.g.,
https://1234abcd.ngrok.io). - Use this URL as the notification URL in PayPal IPN settings for testing purposes.
By following these steps, you can deploy your ASP.NET Core application to IIS on your local machine, set up port forwarding on your router, or use a tunneling service like ngrok to test PayPal IPN on localhost. This allows you to simulate real-world scenarios and ensure your IPN handler is working correctly before deploying to a live environment. Utilizing services of a web development company can further streamline this process, providing expert guidance and support to ensure your payment integration is robust, secure, and efficient.
Conclusion
Integrating PayPal IPN with ASP.NET Core is a must for any ecommerce retailer looking to automate and secure payment processing. This guide covered setting up the ASP.NET Core environment, creating an IPN listener, setting up PayPal settings and testing the setup on localhost. Secure and robust IPN handling enables automated transaction processing, real time customer updates, fraud prevention, timely financial reports, and scalability. For companies looking to implement e-commerce strategies, an ASP.NET development company can help incorporate these features to deliver a secure transaction for both company and consumer.
References
- PayPal IPN Documentation provides comprehensive information on implementing IPN and handling transaction notifications.
- Implementing an IPN Listener offers detailed steps and sample code for setting up an IPN listener.
- ASP.NET Core Documentation includes guides and tutorials for working with ASP.NET Core.
- Download .NET SDK to set up your development environment.
Step into the future with WireFuture at your side. Our developers harness the latest technologies to deliver solutions that are agile, robust, and ready to make an impact in the digital world.

Tapesh Mehta is a seasoned tech worker who has been making apps for the web, mobile devices, and desktop for over 15+ years. Tapesh knows a lot of different computer languages and frameworks. For robust web solutions, he is an expert in Asp.Net, PHP, and Python. He is also very good at making hybrid mobile apps, which use Ionic, Xamarin, and Flutter to make cross-platform user experiences that work well together. In addition, Tapesh has a lot of experience making complex desktop apps with WPF, which shows how flexible and creative he is when it comes to making software. His work is marked by a constant desire to learn and change.
No commitment required. Whether you’re a charity, business, start-up or you just have an idea – we’re happy to talk through your project.
Embrace a worry-free experience as we proactively update, secure, and optimize your software, enabling you to focus on what matters most – driving innovation and achieving your business goals.