State Management with Redux Toolkit: A Comprehensive Guide
State management is an essential part of creating scalable React applications. The management of state becomes more complex as our applications grow. Redux has been used for state management in React but has its own problems with boilerplate code and complicated setup. This is where Redux Toolkit enters the picture. It gives a simpler way to configure and control state in React apps.
This article discusses state management using Redux Toolkit for React applications. Modern Redux practices (slices, thunks, middleware) will be covered. By the end of this guide you need to know how Redux Toolkit can enable you to manage your states in an efficient manner.
Table of Contents
- Why We Need Redux
- Benefits of State Management With Redux Toolkit
- Setting Up Redux Toolkit
- Conclusion
Why We Need Redux
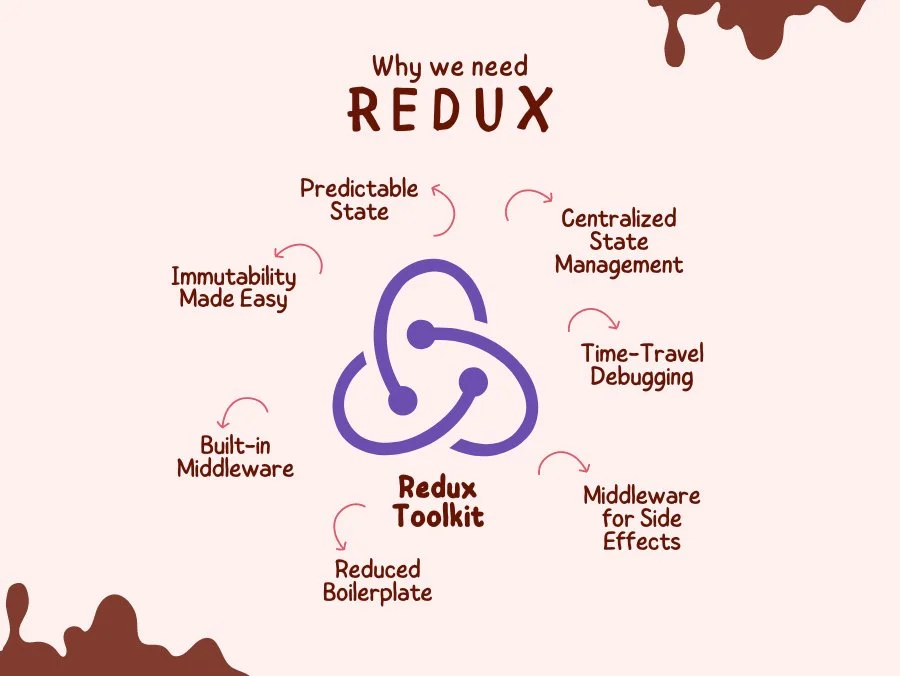
We need to understand why we need Redux before we dive into Redux Toolkit. State management in React development is difficult in large applications with complex state interactions. Here are some reasons why Redux is helpful:
Predictable State: Redux provides a single source of truth for the state in your application. This makes it easier to predict and debug state changes.
Centralized State Management: With Redux, all state transitions are centralized in a single store. This makes it easier to manage and track state changes across the application.
Time-Travel Debugging: Redux’s architecture supports time-travel debugging, allowing developers to step through state changes and understand how the application arrived at its current state.
Middleware for Side Effects: Redux allows you to use middleware to handle side effects, such as asynchronous actions, in a clean and manageable way.
Benefits of State Management With Redux Toolkit
While Redux provides powerful state management capabilities, it also comes with some downsides, such as boilerplate code and a steep learning curve. Redux Toolkit addresses these issues and offers several benefits:
- Simplified Setup: Redux Toolkit provides a set of tools and conventions that simplify the setup and configuration of a Redux store.
- Reduced Boilerplate: With features like slices and the
createSlicefunction, Redux Toolkit reduces the amount of boilerplate code required to manage state. - Built-in Middleware: Redux Toolkit includes built-in middleware for common use cases, such as asynchronous actions with thunks.
- Immutability Made Easy: Redux Toolkit uses Immer under the hood, which allows you to write immutable update logic in a more natural way.
Setting Up Redux Toolkit
Installation
To get started with Redux Toolkit, you need to install the necessary packages. You can do this using npm or yarn:
npm install @reduxjs/toolkit react-reduxCreating a Redux Store
The first step in setting up Redux Toolkit is to create a Redux store. The configureStore function from Redux Toolkit simplifies this process:
import { configureStore } from '@reduxjs/toolkit';

const store = configureStore({
  reducer: {
    // Add your reducers here
  },
});

export default store;
Creating Slices
Slices are a key concept in Redux Toolkit that allow you to define a piece of the state and the reducers that operate on it. The createSlice function makes it easy to create slices:
import { createSlice } from '@reduxjs/toolkit';

const counterSlice = createSlice({
  name: 'counter',
  initialState: { value: 0 },
  reducers: {
    increment: (state) => {
      state.value += 1;
    },
    decrement: (state) => {
      state.value -= 1;
    },
    incrementByAmount: (state, action) => {
      state.value += action.payload;
    },
  },
});

export const { increment, decrement, incrementByAmount } = counterSlice.actions;
export default counterSlice.reducer;
In this example, we create a counterSlice with an initial state and three reducers: increment, decrement, and incrementByAmount. The createSlice function automatically generates action creators and action types based on the reducers you define.
Integrating Slices with the Store
Once you have created your slices, you need to integrate them with the Redux store. You do this by adding the reducers from your slices to the configureStore function:
import { configureStore } from '@reduxjs/toolkit';
import counterReducer from './counterSlice';

const store = configureStore({
  reducer: {
    counter: counterReducer,
  },
});

export default store;
Connecting React Components
To connect your React components to the Redux store, you need to use the useSelector and useDispatch hooks from React Redux:
import React from 'react';
import { useSelector, useDispatch } from 'react-redux';
import { increment, decrement, incrementByAmount } from './counterSlice';
function Counter() {
const count = useSelector((state) => state.counter.value);
const dispatch = useDispatch();
return (
{count}
);
}
export default Counter;Using Thunks for Asynchronous Logic
Redux Toolkit includes built-in support for thunks, which allow you to handle asynchronous actions. Thunks are functions that return another function, which can contain asynchronous logic:
import { createAsyncThunk, createSlice } from '@reduxjs/toolkit';
import axios from 'axios';

export const fetchUser = createAsyncThunk('user/fetchUser', async (userId) => {
  const response = await axios.get(`/api/users/${userId}`);
  return response.data;
});

const userSlice = createSlice({
  name: 'user',
  initialState: { user: null, status: 'idle' },
  reducers: {},
  extraReducers: (builder) => {
    builder
      .addCase(fetchUser.pending, (state) => {
        state.status = 'loading';
      })
      .addCase(fetchUser.fulfilled, (state, action) => {
        state.status = 'succeeded';
        state.user = action.payload;
      })
      .addCase(fetchUser.rejected, (state) => {
        state.status = 'failed';
      });
  },
});

export default userSlice.reducer;
In this example, we use the createAsyncThunk function to create an asynchronous thunk action called fetchUser. The thunk dispatches different actions based on the state of the asynchronous request (pending, fulfilled, or rejected).
Middleware
Redux Toolkit also simplifies the usage of middleware. Middleware can be added to the store during its configuration:
import { configureStore } from '@reduxjs/toolkit';
import logger from 'redux-logger';
import counterReducer from './counterSlice';

const store = configureStore({
  reducer: {
    counter: counterReducer,
  },
  middleware: (getDefaultMiddleware) => getDefaultMiddleware().concat(logger),
});

export default store;
In this example, we add the redux-logger middleware to the store. The getDefaultMiddleware function provides a set of default middleware, and we use the concat method to add our custom middleware.
Conclusion
Redux Toolkit is powerful tool that provides state management for React applications. Redux Toolkit reduces boilerplate code and offers built-in support for common use cases enabling programmers to handle state in a maintainable and scalable manner.
This guide demonstrated how to set up Redux Toolkit, create slices, connect slices to the store, connect React components, use thunks for asynchronous logic, and add middleware. Follow these practices and you can use the full power of Redux Toolkit to develop robust React applications.
While state management is crucial, performance optimization is equally important for production applications. Learn how to reduce frontend bundle size in large React apps to ensure your state management implementation doesn’t negatively impact load times and user experience.
In the ongoing debate of React vs Angular, Redux Toolkit is a significant advantage for React developers, providing streamlined state management and enhancing developer experience. If you want state management and more developer experience within your React projects, you need to check out Redux Toolkit.
Dream big, because at WireFuture, no vision is too ambitious. Our team is passionate about turning your software dreams into reality, with custom solutions that exceed expectations.

Tapesh Mehta is a seasoned tech worker who has been making apps for the web, mobile devices, and desktop for over 15+ years. Tapesh knows a lot of different computer languages and frameworks. For robust web solutions, he is an expert in Asp.Net, PHP, and Python. He is also very good at making hybrid mobile apps, which use Ionic, Xamarin, and Flutter to make cross-platform user experiences that work well together. In addition, Tapesh has a lot of experience making complex desktop apps with WPF, which shows how flexible and creative he is when it comes to making software. His work is marked by a constant desire to learn and change.
No commitment required. Whether you’re a charity, business, start-up or you just have an idea – we’re happy to talk through your project.
Embrace a worry-free experience as we proactively update, secure, and optimize your software, enabling you to focus on what matters most – driving innovation and achieving your business goals.