Deep Dive: Blazor Tutorial for Robust .NET Web Development

In this blog post, we will delve into the Blazor tutorial, offering a deep dive into how you can harness this powerful framework to build dynamic .NET web applications. When we explore Blazor, we need to know what it is and what it does for the contemporary web development. Blazor is an important contribution to the .NET framework and offers an effective framework to produce interactive and dynamic UIs for web apps. This particular framework differentiates itself by permitting the usage of C#, an established and powerful programming language for the client and server side development.
Blazor is a new era in web development. Typically, website developers used JavaScript heavily to make websites interactive and responsive to user actions. But Blazor brings a new approach: developers could leverage their experience and understanding of C# across the development stack. This standardization of language usage simplifies development and also improves productivity and shortens learning curve for.NET developers considering web application development.
Blazor benefits from being an element of the .NET ecosystem. For one, it enables rich, interactive web UIs built on top of C#. Secondly, it offers access to a great number of .NET libraries and tools, extending the options of web application development. Additionally, Blazor supports interoperability with existing .NET codebases, making it a good option for enterprises that wish to extend their web presence without shifting away from their .NET foundation.
Table of Contents
- Blazor’s Diverse Architectures: Server-side vs. WebAssembly
- Blazor Tutorial: Prerequisite Development Tools
- Blazor Tutorial: Installation Guide
- Blazor tutorial: Creating Your First Blazor App:
- Blazor tutorial: Routing in Blazor
- Blazor Tutorial: Implementing CRUD Operations in Blazor
- Blazor Tutorial: Understanding Blazor Forms and Validation
- Blazor Tutorial: Event Handling in Blazor Applications
- Blazor Tutorial: Strategies for State Management in Blazor Applications
- Conclusion
- Frequently Asked Questions (FAQ)
Blazor’s Diverse Architectures: Server-side vs. WebAssembly
As a modern web development framework, Blazor offers two different models for application development: Blazor Server & Blazor WebAssembly. These models enable developers to select the approach which best fits their application requirements and deployment scenario, with each approach offering its own characteristics and advantages.
Server (Blazor)
Blazor server is based on the server side processing principle, meaning all application logic and UI interactions are handled on the server. This model produces a SignalR connection, a real time web functionality which enables server-side code to send asynchronous notifications to client side web apps. The Blazor server model is similar to a reliable mechanism, where the Server does the heavy lifting and also reduces the client load. This particular approach considerably reduces client-side resources usage since the UI updates are sent to the client over a SignalR connection. Consequently, applications developed with Blazor Server experience fast response times and decreased client side complexity. This particular model is especially helpful for applications in which server-side processing is crucial and in which a persistent connection to the server is achievable.
Blazor WebAssembly
On the other hand, Blazor WebAssembly represents a far more autonomous model whereby .NET code is executed in the browser using WebAssembly. This technology enables the browser to execute compiled code as it would with JavaScript, but with the performance and abilities associated with a lower level language like C#. Blazor WebAssembly applications are characterized by their server – independent nature, providing offline capabilities and a richer, more interactive user experience without the need for server communication. This model utilizes client computing resources and allows big applications to run smoothly in the user’s browser. It is especially suited for big client-side interactions and applications that benefit from the lower latency of running code locally on the client.
Both Blazor Server and Blazor WebAssembly provide developers with powerful tools for creating web applications. Each of these models is selected based on application requirements, including offline capability, server load reduction, or interaction responsiveness. With these two architectures, Blazor enables flexible, high performance web applications for a range of business needs and user experiences.
Blazor Tutorial: Prerequisite Development Tools
Before diving into Blazor, it’s essential to set up your development environment with the following tools:
- .NET SDK: Blazor is a part of the .NET ecosystem, requiring the .NET Software Development Kit (SDK) for building and running Blazor applications. The SDK includes everything you need to develop .NET applications, including Blazor.
- Code Editor or Integrated Development Environment (IDE): While you can use any text editor for coding, an IDE or a code editor like Visual Studio Code (VS Code) or Visual Studio offers integrated support for .NET development, making the process more efficient. Visual Studio, with its comprehensive .NET support, is highly recommended for Blazor development, especially for beginners.
- Web Browser: A modern web browser is necessary for viewing and testing your Blazor applications. Browsers such as Google Chrome, Mozilla Firefox, Microsoft Edge, or Safari are suitable choices.
Blazor Tutorial: Installation Guide
- Installing .NET SDK:
- Navigate to the official .NET download page: https://dotnet.microsoft.com/download
- Choose the SDK for your operating system (Windows, macOS, or Linux) and follow the installation instructions provided on the site. This will install the .NET SDK, which includes the runtime and command-line tools for .NET development.
- Installing Visual Studio Code or Visual Studio:
- For Visual Studio Code:
- Download VS Code from https://code.visualstudio.com/
- Install the C# extension from the Visual Studio Code marketplace, which provides support for .NET development, including Blazor.
- For Visual Studio:
- Download Visual Studio from https://visualstudio.microsoft.com/downloads/
- During installation, select the “ASP.NET and web development” workload, which includes all necessary components for Blazor development.
- For Visual Studio Code:
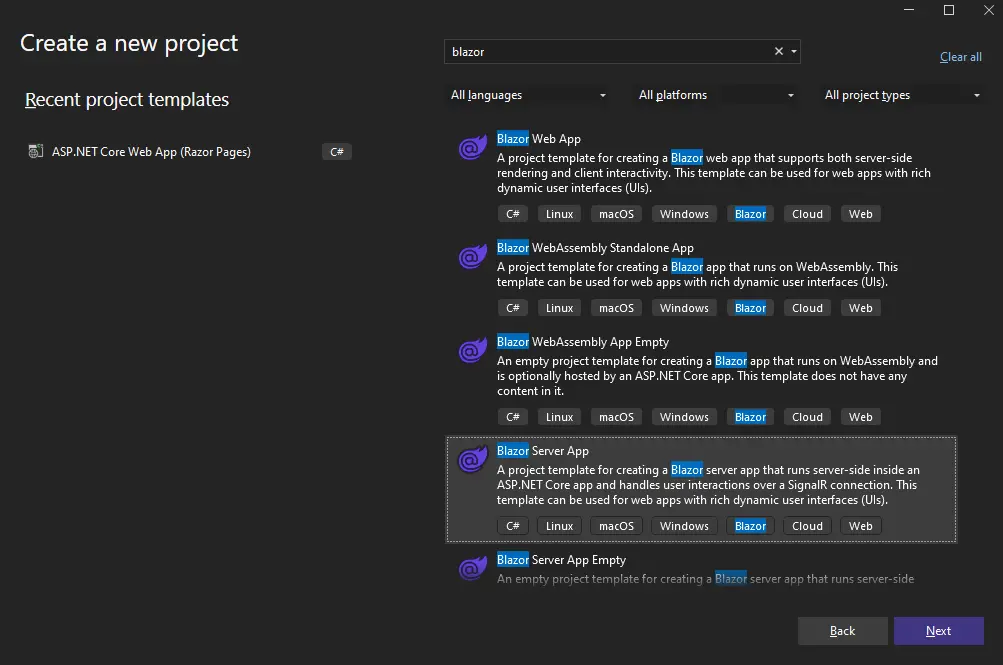
Blazor tutorial: Creating Your First Blazor App:
- Open Visual Studio and select “Create a new project”.
- Search for “Blazor” in the project template search box, and select “Blazor Server App”. Click Next.
- Once the project is created, you can run it by pressing F5 or the “IIS Express” button in Visual Studio.
Blazor tutorial: Routing in Blazor
Routing in Blazor, a key topic covered in our Blazor tutorial is a core element which guides the user through the application. It maps URL paths to components and directs users to the right content whenever they interact with the application. In the context of .NET development services, mastering routing in Blazor is essential for developers aiming to create robust and user-friendly web solutions. The following explanation explains routing in Blazor with code examples that deal with nearly all of the fundamentals.
Defining Routes in Components
Routing in Blazor is achieved through the use of the @page directive, which specifies the URL pattern that a component responds to. Consider a Blazor app with a component named HomePage.razor. To define a route for this component, one would include the @page directive at the top of the file:
@page "/home"

<h1>Welcome to the Home Page</h1>
This code snippet instructs the Blazor router that the HomePage component should be displayed when the URL path matches /home.
Parameterized Routes
Blazor routing also supports parameterized routes, allowing dynamic content to be passed to components based on the URL. For example, if you have a UserProfile component that displays information based on a user ID, the route can be defined as follows:
@page "/user/{UserId}"

<h1>User Profile</h1>
<p>User ID: @UserId</p>

@code {
    [Parameter]
    public string UserId { get; set; }
}
In this example, any URL that matches the pattern /user/{UserId} will render the UserProfile component, with the UserId parameter populated from the URL.
Navigating Programmatically
Besides declarative navigation through links, Blazor allows for programmatic navigation using the NavigationManager service. This is particularly useful for scenarios where navigation decisions are made at runtime. The following code sample demonstrates how to inject the NavigationManager and navigate to a different page:
@inject NavigationManager NavigationManager

<button @onclick="NavigateToHome">Go to Home</button>

@code {
    private void NavigateToHome()
    {
        NavigationManager.NavigateTo("/home");
    }
}
This button, when clicked, will use the NavigationManager to navigate the user to the /home route.
Handling Not Found Pages (404)
To handle unknown routes, commonly resulting in a 404 error, Blazor allows the definition of a catch-all route. This is done by specifying a route template that captures all paths:
@page "/{**catchall}"

<h1>Page Not Found</h1>
This component will be displayed for any URL that does not match an existing route, providing a user-friendly way to handle navigation errors.
Blazor Tutorial: Implementing CRUD Operations in Blazor
With regards to Blazor applications, CRUD operations need a combination of Blazor user interface and backend services for data access. This section explains how you can implement CRUD operations in a Blazor application, with extensive code samples to help understand the principles.
Model Definition
Before delving into the CRUD operations, define a model to represent the data. Assume a simple Product model:
public class Product
{
    public int Id { get; set; }
    public string Name { get; set; }
    public decimal Price { get; set; }
}
Create Operation
To add a new Product, define a component with a form for inputting the product details. The form submission will trigger the create operation.
@page "/product/create"
@inject IProductService ProductService

<EditForm Model="@product" OnValidSubmit="HandleValidSubmit">
    <DataAnnotationsValidator />
    <InputText id="name" @bind-Value="product.Name" />
    <InputNumber id="price" @bind-Value="product.Price" />
    <button type="submit">Create Product</button>
</EditForm>

@code {
    private Product product = new Product();

    private async Task HandleValidSubmit()
    {
        await ProductService.AddProduct(product);
        NavigationManager.NavigateTo("/products");
    }
}
Read Operation
Displaying a list of products can be achieved by fetching the data from the server and rendering it in a component.
@page "/products"
@inject IProductService ProductService

@if (products == null)
{
    <p><em>Loading...</em></p>
}
else
{
    <ul>
    @foreach (var product in products)
    {
        <li>@product.Name - @product.Price</li>
    }
    </ul>
}

@code {
    private List<Product> products;

    protected override async Task OnInitializedAsync()
    {
        products = await ProductService.GetProducts();
    }
}
Update Operation
Updating a product involves retrieving the product details, editing them, and submitting the changes.
@page "/product/edit/{Id:int}"
@inject IProductService ProductService

<EditForm Model="@product" OnValidSubmit="HandleValidSubmit">
    <DataAnnotationsValidator />
    <InputText id="name" @bind-Value="product.Name" />
    <InputNumber id="price" @bind-Value="product.Price" />
    <button type="submit">Update Product</button>
</EditForm>

@code {
    [Parameter]
    public int Id { get; set; }

    private Product product;

    protected override async Task OnInitializedAsync()
    {
        product = await ProductService.GetProductById(Id);
    }

    private async Task HandleValidSubmit()
    {
        await ProductService.UpdateProduct(product);
        NavigationManager.NavigateTo("/products");
    }
}
Delete Operation
Deleting a product can be facilitated through a button or link that invokes the delete function on the corresponding product.
@page "/product/delete/{Id:int}"
@inject IProductService ProductService

<h3>Are you sure you want to delete this product?</h3>
<button @onclick="DeleteProduct">Delete</button>
<button @onclick="Cancel">Cancel</button>

@code {
    [Parameter]
    public int Id { get; set; }

    private async Task DeleteProduct()
    {
        await ProductService.DeleteProduct(Id);
        NavigationManager.NavigateTo("/products");
    }

    private void Cancel()
    {
        NavigationManager.NavigateTo("/products");
    }
}
In the previously mentioned examples, IProductService is a service interface which abstracts the fetching, updating, adding, and deleting of products operations. These operations usually connect to a database or external API to store changes. This service should be deployed based upon your backend technologies (Entity Framework Core for a SQL database or HTTPClient for an external API).
Blazor Tutorial: Understanding Blazor Forms and Validation
This section will explore how to implement forms and validation in Blazor, complete with detailed code examples to illustrate the concepts.
Creating a Form in Blazor
Blazor utilizes the EditForm component to manage form submissions. This component integrates seamlessly with Blazor’s data binding and validation mechanisms. Consider a simple model representing a user:
public class User
{
    public string Name { get; set; }
    public string Email { get; set; }
}
To capture user input, you can define a form in Blazor as follows:
@page "/user-form"
<EditForm Model="@user" OnValidSubmit="HandleValidSubmit">
    <DataAnnotationsValidator />
    <ValidationSummary />

    <div>
        <label for="name">Name:</label>
        <InputText id="name" @bind-Value="user.Name" />
    </div>
    <div>
        <label for="email">Email:</label>
        <InputText id="email" @bind-Value="user.Email" />
    </div>
    <button type="submit">Submit</button>
</EditForm>

@code {
    private User user = new User();

    private void HandleValidSubmit()
    {
        // Handle the form submission here
    }
}
In this example, DataAnnotationsValidator is used to apply validation rules defined via data annotations in the model.
Adding Validation
Blazor supports model validation through data annotations. Extend the User model to include validation rules:
using System.ComponentModel.DataAnnotations;

public class User
{
    [Required]
    [StringLength(100, MinimumLength = 3)]
    public string Name { get; set; }

    [Required]
    [EmailAddress]
    public string Email { get; set; }
}
The Required attribute ensures the field is not left empty, StringLength sets the minimum and maximum length for the Name, and EmailAddress ensures the Email is in a valid email format.
Custom Validation Messages
To customize validation messages, you can specify an error message in the data annotations:
public class User
{
    [Required(ErrorMessage = "Name is required.")]
    [StringLength(100, MinimumLength = 3, ErrorMessage = "Name must be between 3 and 100 characters.")]
    public string Name { get; set; }

    [Required(ErrorMessage = "Email is required.")]
    [EmailAddress(ErrorMessage = "Invalid email format.")]
    public string Email { get; set; }
}
Handling Form Submission
The EditForm component’s OnValidSubmit event is triggered when the form is submitted without any validation errors. The HandleValidSubmit method defined in the @code block is executed to process the form data.
@code {
    private User user = new User();

    private void HandleValidSubmit()
    {
        // Implementation for form submission
        Console.WriteLine($"Name: {user.Name}, Email: {user.Email}");
    }
}
Displaying Validation Messages
To show validation messages for individual form fields, use the ValidationMessage component. This component displays the validation message for the specified field if any:
<div>
    <label for="name">Name:</label>
    <InputText id="name" @bind-Value="user.Name" />
    <ValidationMessage For="@(() => user.Name)" />
</div>
<div>
    <label for="email">Email:</label>
    <InputText id="email" @bind-Value="user.Email" />
    <ValidationMessage For="@(() => user.Email)" />
</div>
This detailed exploration of forms and validation in Blazor demonstrates how the framework facilitates the creation of robust, user-friendly forms. Through the use of data annotations for validation, along with Blazor’s built-in form components, developers can efficiently implement forms that ensure data integrity and provide meaningful feedback to users.
Blazor Tutorial: Event Handling in Blazor Applications
This section delves into the mechanisms of event handling within Blazor, offering comprehensive code examples to illustrate how various user interactions can be managed and responded to effectively.
Handling Button Clicks
One of the most common user interactions is clicking a button. In Blazor, this can be handled by binding a method to the button’s onclick event:
<button @onclick="OnButtonClick">Click Me</button>

@code {
    private void OnButtonClick()
    {
        Console.WriteLine("Button was clicked!");
    }
}
In this example, clicking the button triggers the OnButtonClick method, which could be used to update the UI or perform other actions.
Handling Text Input
Responding to text input changes is another fundamental aspect of interactive applications. Blazor allows you to bind methods to input changes using the oninput event:
<input @oninput="OnInputChanged" />

@code {
    private void OnInputChanged(ChangeEventArgs e)
    {
        var enteredText = e.Value.ToString();
        Console.WriteLine($"Input changed to: {enteredText}");
    }
}
This code sample demonstrates how to capture and react to changes in a text input field.
Form Submission Handling
Blazor forms can listen for the submit event, allowing you to run validation and process the form data:
<EditForm Model="@exampleModel" OnValidSubmit="HandleValidSubmit">
    <InputText @bind-Value="exampleModel.Text" />
    <button type="submit">Submit</button>
</EditForm>

@code {
    private ExampleModel exampleModel = new ExampleModel();

    private void HandleValidSubmit()
    {
        Console.WriteLine($"Form submitted with text: {exampleModel.Text}");
    }

    public class ExampleModel
    {
        public string Text { get; set; }
    }
}
Event Callbacks with Parameters
Blazor also supports passing parameters to event callback methods, which is useful for passing additional data during event handling:
@foreach (var item in items)
{
    <button @onclick="(() => OnItemClick(item))">Click @item</button>
}

@code {
    private List<string> items = new List<string> { "Item 1", "Item 2", "Item 3" };

    private void OnItemClick(string item)
    {
        Console.WriteLine($"{item} was clicked!");
    }
}
This example demonstrates handling clicks on a list of items, where each button click passes the item name to the event handler.
Debouncing and Throttling Input Events
For events that fire frequently, such as typing in a text field, debouncing and throttling can be used to limit the number of method invocations:
<input @oninput="OnInputChanged" />

@code {
    private Timer debounceTimer;
    private string searchText;

    private void OnInputChanged(ChangeEventArgs e)
    {
        if (debounceTimer != null)
        {
            debounceTimer.Dispose();
        }

        debounceTimer = new Timer(_ =>
        {
            InvokeAsync(() =>
            {
                searchText = e.Value.ToString();
                Console.WriteLine($"Search for: {searchText}");
                StateHasChanged(); // If necessary, to update the UI
            });
        }, null, 500, Timeout.Infinite); // 500 ms debounce period
    }
}
In this code, the OnInputChanged method is called for each input event, but it uses a timer to debounce the calls, ensuring that the search operation (or any other intensive task) is only performed after the user has stopped typing for a specified period (500 ms in this example).
Blazor Tutorial: Strategies for State Management in Blazor Applications
Efficient state management is crucial for keeping the application state synchronized across components, thereby facilitating a seamless user experience. This section delineates various strategies for state management in Blazor, supported by illustrative code samples. For those looking to enhance their projects with these advanced techniques, hire Blazor developers to provide the expertise needed to implement these strategies effectively, elevating your application to new heights.
Using Component Parameters for Parent-Child Communication
One of the simplest forms of state management in Blazor involves passing data between parent and child components through parameters. The child component declares parameters using the [Parameter] attribute, which the parent component can then set to pass data down.
Child Component (Child.razor):
@code {
    [Parameter]
    public string Message { get; set; }
}
Parent Component:
<Child Message="@parentMessage" />

@code {
    private string parentMessage = "Hello from parent";
}
EventCallback for Child-to-Parent Communication
To communicate changes from the child back to the parent, EventCallback is used. This enables the child to notify the parent of changes, allowing the parent to update its state accordingly.
Child Component (Child.razor):
<button @onclick="NotifyParent">Click Me</button>

@code {
    [Parameter]
    public EventCallback OnChildClicked { get; set; }

    private async Task NotifyParent()
    {
        await OnChildClicked.InvokeAsync(null);
    }
}
Parent Component:
<Child OnChildClicked="HandleChildClick" />

@code {
    private void HandleChildClick()
    {
        Console.WriteLine("Child was clicked");
    }
}
State Container for Cross-Component Communication
For more complex scenarios or for managing shared state across multiple components, a state container pattern can be implemented. This involves creating a service that holds the shared state and using dependency injection to provide it to the components that require access to the state.
State Container (AppState.cs):
public class AppState
{
    public string SharedMessage { get; private set; }

    public event Action OnChange;

    public void SetMessage(string message)
    {
        SharedMessage = message;
        NotifyStateChanged();
    }

    private void NotifyStateChanged() => OnChange?.Invoke();
}
Registering the State Container:
In Program.cs or Startup.cs, register the AppState as a singleton:
services.AddSingleton<AppState>();Using the State Container in Components:
Inject the AppState into components and subscribe to the OnChange event to refresh the component when the state changes.
@inject AppState AppState

@implements IDisposable

<h3>@AppState.SharedMessage</h3>

@code {
    protected override void OnInitialized()
    {
        AppState.OnChange += StateHasChanged;
    }

    public void Dispose()
    {
        AppState.OnChange -= StateHasChanged;
    }
}
Cascading Values for Deeply Nested Components
Blazor’s <CascadingValue> component allows you to provide a value (such as state container) down the component tree without having to pass it as a parameter at every level.
Parent Component:
<CascadingValue Value="AppState">
    <ChildComponent />
</CascadingValue>
Child Component:
The child component can then access the cascaded value using the [CascadingParameter] attribute:
@code {
    [CascadingParameter]
    public AppState AppState { get; set; }
}
Utilizing Blazor Fluxor for State Management
For applications requiring advanced state management, third-party libraries like Fluxor—an implementation of the Flux architecture pattern—can be adopted. Fluxor provides a structured approach to managing state, actions, and reducers in a Blazor application.
Defining a State, Action, and Reducer:
- State: Represents the current state.
- Action: Defines an action to change the state.
- Reducer: Describes how an action transforms the state.
Installation and setup instructions, along with specific usage, can be found in the Fluxor documentation.
Conclusion
In this Blazor tutorial it’s pretty clear that Blazor’s quick evolution is testament to its resilience and adaptability, continuously integrating new web standards and technologies. With capabilities like WebAssembly for client side execution and Server side rendering for dynamic content, Blazor is ready to transform what is possible in web applications. As Blazor evolves, it should provide even stronger and smoother development experiences for both developers and users to be fully satisfied with its capabilities.
Looking to innovate with Blazor for your next project? WireFuture, a leading .NET development company, is at the cutting edge of utilizing Blazor to produce dynamic and robust web applications. Our experience ensures your project utilizes the very best of the latest .NET technologies while determining brand new benchmarks for performance and user experience. Let us develop the future of web development together. Get in touch with WireFuture right now.
Frequently Asked Questions (FAQ)
Blazor is a framework from Microsoft that allows developers to build interactive web applications using C# and .NET technologies instead of JavaScript.
Blazor simplifies web development by enabling developers to use familiar .NET tools and C# programming language, offering a unified development experience across client and server-side code.
Blazor has two hosting models: Blazor Server, which runs server-side code and interacts with the client via SignalR, and Blazor WebAssembly, which runs C# code directly in the browser using WebAssembly.
Yes, Blazor allows developers to leverage existing .NET libraries and tools, facilitating code reuse and streamlining the development process.
Routing in Blazor is a mechanism that matches browser URLs to application components, enabling navigation and content delivery within a Blazor application, a critical concept explored in our Blazor tutorial.
Blazor offers various strategies for state management, including component parameters, cascading values, and dedicated state containers, to synchronize application state across components.
To start learning Blazor, review official Blazor documentation, follow structured tutorials like the Blazor tutorial discussed in this blog post, and practice building simple to complex applications.
Blazor’s unique selling point is its ability to run .NET code in the browser via WebAssembly and its seamless integration with the .NET ecosystem, offering a robust alternative to traditional JavaScript frameworks.
For projects requiring professional expertise, consider hiring Blazor developers from specialized .NET development company, such as WireFuture, known for their proficiency in modern web application development with Blazor.
WireFuture's team spans the globe, bringing diverse perspectives and skills to the table. This global expertise means your software is designed to compete—and win—on the world stage.

Tapesh Mehta is a seasoned tech worker who has been making apps for the web, mobile devices, and desktop for over 15+ years. Tapesh knows a lot of different computer languages and frameworks. For robust web solutions, he is an expert in Asp.Net, PHP, and Python. He is also very good at making hybrid mobile apps, which use Ionic, Xamarin, and Flutter to make cross-platform user experiences that work well together. In addition, Tapesh has a lot of experience making complex desktop apps with WPF, which shows how flexible and creative he is when it comes to making software. His work is marked by a constant desire to learn and change.
No commitment required. Whether you’re a charity, business, start-up or you just have an idea – we’re happy to talk through your project.
Embrace a worry-free experience as we proactively update, secure, and optimize your software, enabling you to focus on what matters most – driving innovation and achieving your business goals.